6. MoonShineP: Software setup
Contents
6. MoonShineP: Software setup#
Setting up a new Raspberry Pi#
On a computer go to the Raspberry Pi website https://www.raspberrypi.com/software/ to download and install the Raspberry Pi Imager.
In the Raspberry Pi Imager, install Raspberry Pi OS (Legacy) on the micro SD card.
Connect the monitor, keyboard, and mouse to the Raspberry Pi.
Insert the micro SD card into the Raspberry Pi.
Connect power to the Raspberry Pi to boot it up.
Follow the instructions in the setup pages. Connect to the internet, and perform the prompted update on first launch. Note down the username and password that are utilized.
Install Python 3.9.9.
Attention
MoonShineP DOES NOT SUPPORT OTHER VERSIONS OF PYTHON
Reference: How to Update Python on Raspberry Pi
Enter the following sequence of commands in the terminal:
wget https://www.python.org/ftp/python/3.9.9/Python-3.9.9.tgz
tar -zxvf Python-3.9.9.tgz
cd Python-3.9.9
./configure --enable-optimizations
sudo make altinstall
cd /usr/bin
sudo rm python
sudo ln -s /usr/local/bin/python3.9 python
Check Python version is version (3.9.9) by entering:
python --version
Attention
It must be Python 3.9.9
Reboot the Raspberry Pi.
Modify the Raspberry Pi to run the ws2811 library.
Reference: Connect and Control WS2812 RGB LED Strips via Raspberry Pi
In terminal, enter the following sequence of commands:
sudo apt-get update
sudo apt-get install gcc make build-essential python-dev git scons swig
Confirm with Y
This following command line will open a file editor. To deactivate audio output, edit the
.conffile by entering the following command:sudo nano /etc/modprobe.d/snd-blacklist.conf
A new terminal window will open. In this window add the following line text:
blacklist snd_bcm2835
Then save file with CTRL + O.
And close the editor with CTRL + X.
We also need to edit another file. To do so, enter:
sudo nano /boot/config.txt
When the editor is opened, comment out the following line with a # at the beginning:
dtparam=audio=on
i.e.,
#dtparam=audio=onThen save file with CTRL + O.
And close the editor with CTRL + X.
Reboot the Raspberry Pi by entering:
sudo reboot
Download rpi_ws281x library by entering:
cdgit clone https://github.com/jgarff/rpi_ws281x
Next, modify the following lines to specify using the SK6812 protocol:
Using the file explorer, open the
main.cfile found in /home/pi/rpi_ws281x/The line of “STRIP_TYPE WS2811_STRIP_RGB” is turned on by default for LED ws2811 (should be Line 63), so turn it off by adding // at the beginning of the line.
Instead, turn on the line of “STRIP_TYPE WS6812_STRIP_RGBW” (should be line 64) for SK6812 by deleting the // at the beginning of the line.
On the line beginning with ‘define HEIGHT’ (should be line 67) edit the number to 1.
The value of the line beginning with ‘define WIDTH’ is unimportant and should be left at its default (should be line 66). This is because it is expected that the user will use a different number of LED strips for the moonlight array (two LED strip should suffice) and sunlight/twilight array (likely need more than two LED strips). The different number of LEDs being used for the two arrays are specified in the python file
moonshine_moon.pyandmoonshine_sun.py, detailed later.Save file.
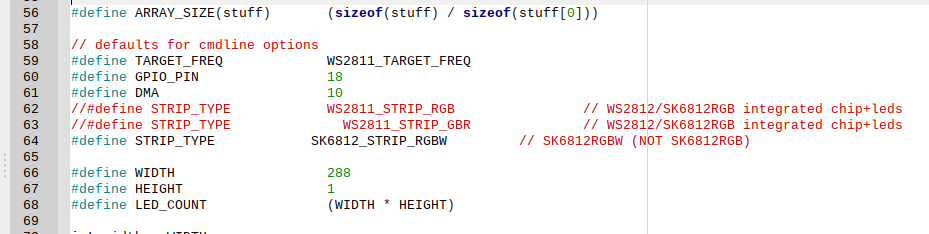
Fig. 34 The configuration of the
main.cfile.#Next, compile the library for Python.
In terminal, enter the following commands:
cdcd rpi_ws281x/
sudo scons
Now the Raspberry Pi should be ready to control the SK6812 LED strips.
Setup real time clock (RTC) and time#
A real time clock module is optional but recommended. We recommend that the user runs the Raspberry Pi offline, and instead uses the RTC to keep time. This is because when the Raspberry Pi is online it will automatically update to the local time. This may use daylight saving time, DST, which can be troublesome. The RTC is also essential if the Raspberry Pi is used in a location with no internet connection.
Install RTC module DS3231 as described in Assemble Raspberry Pi and LED strips.
On the task bar of the main Linux window of Raspberry Pi, go to the Start menu (top left button) and enable the RTC module by selecting the following options: > Preferences > Raspberry Pi Configuration > Interfaces > I2C Enable > OK
Install RTC configurations (see video reference: Real Time Clock Script for Raspberry Pi, and this online tutorial: Adding a Real Rime Clock to your Raspberry Pi)
In terminal enter:
wget https://raw.githubusercontent.com/km4ack/pi-scripts/master/rtc && bash rtc
When the terminal returns: “Is the time above correct?”, respond accordingly (Y/N).
When the terminal returns: “Do you see 68 in the info listed above?”, respond accordingly (Y/N). (Note to user: you may see UU instead of 68)
Note
This rtc installation works for both DS 1307 or DS 3231 RTC chips
Turn off DST by setting the time zone to UTC. In terminal, enter:
sudo raspi-config
Select option 5 Internationalization Options
Select 12 Change Time Zone
At the bottom select None of the above
Select UTC and OK
Change Raspberry Pi’s clock to the user’s current time (without DST, even if the user is currently experiencing DST), by entering into the terminal terminal:
sudo date -s 'YYYY-MM-DD hh:mm:ss'
Change the above to the user’s current time, for example ‘2022-01-01 01:01:00’.
Copy the time from the Raspberry Pi system to the Hardware RTC by entering:
sudo hwclock -w
To check if RTC is working, enter:
sudo hwclock -rv
The RTC time will be reported.
Desktop folders#
Download the control_moon and control_sun folders (download in Download files).
control_moon contains
moonshine_moon.pycontrol_sun contains
moonshine_sun.py
Move the two folders to the Raspberry Pi Desktop.
Note
In
moonshine_moon.py, the line of LED_PIN = 18 specifies the communication with the moonlight LED strip through the GPIO 18. Inmoonshine_sun.py, the line of LED_PIN = 21 controls the sunlight/twilight LED strip through GPIO 21 instead.In additional, download
clear_moon.pyandclear_sun.pyput them directly on the Raspberry Pi Desktop.
Setting up systemd service#
Running MoonShineP using the Linux systemd service manager allows it to recover and resume light re-creation automatically, in the unlikely event of a crash.
Create a new service file.
In terminal, enter:
sudo nano /etc/systemd/system/moonshine_moon.service
The file editor will open up a blank file, paste in the following lines:
[Unit]
Description=relaunch moonshine_moon.py when crashed

[Service]
User=root
Group=root
Type=shineple
ExecStart=sudo /usr/bin/python3 /home/pi/Desktop/control_moon/moonshine_moon.py
Restart=always
RestartSec=3

[Install]
WantedBy=default.target
Note
The line of “ExecStart=…” instructs system service to locate the MoonShineP python script in the correct directory. Restart=always and RestartSec=3 are configured to restart
moonshine_moon.pywithin 3 seconds upon closing (i.e., the script crashing).Then save file with CTRL + O. CTRL + X to close the editor.
When prompted for the file name, confirm that it is
moonshine_moon.serviceand save.Refresh the system service files. It may ask for the username and password (if so enter the username and password). Enter in terminal:
sudo systemctl daemon-reload
(Optional) If the user is recreating sunlight and twilight as well, repeat the above steps, from 1 to 4, to make another service for control_sun/moonshine_sun.py
For step 1, use a different file name:
sudo nano /etc/systemd/system/moonshine_sun.service
For step 2, replace the line of
ExecStart=...withExecStart=sudo /usr/bin/python3 /home/pi/Desktop/control_sun/moonshine_sun.py
For step 3, save the file with name
moonshine_sun.service
Note
Every time a
.servicefile is edited, it requires a refresh (see Step 4).
Setting LED numbers in moonshine_moon.py and moonshine_sun.py#
Recall that in 2. MoonShineR: Moonlight scheduler and 3. MoonShineR: Sunlight/twilight scheduler, the user was required to enter the specifications of the LED array (diode_per_strip and strip_count) into the R program. This was essential for generating the schedule
.csv. It is important that LED_COUNT (below) in MoonShineP python script represents the product of diode_per_strip (from MoonShineR) and strip_count (from MoonShineR).
To calculate the total number of LEDs, diode_per_strip should be multiplied by strip_count. E.g., 144 x 4 = 576.
Edit the line of “LED_COUNT” in
moonshine_moon.pyandmoonshine_sun.pywith the respective total number of LEDs for each array (see Fig. 35).
Fig. 35 Specify the line of “LED_COUNT” in
moonshine_sun.pyto 576 when using four daisy-chained 144 LED strips.#Save the file.
Note
When changing the number of LEDs number in an array, change the corresponding settings in MoonShineR schedulers and the MoonShineP python file. This will, of course, also require a recalibration of the illuminance.