5. MoonShineP: Hardware setup
Contents
5. MoonShineP: Hardware setup#
Materials#
Item |
SKU/model number |
Company |
Quantity required |
Price |
Link |
Note |
|---|---|---|---|---|---|---|
Raspberry Pi 4 model B kit |
B0B7DFF7TY |
GeeekPi |
1 |
$200 |
||
RTC module (DS3231) |
3-01-1198 |
HiLetgo |
1 |
$19 |
- |
|
Generic mouse and keyboard |
- |
- |
1 |
~40 |
- |
- |
Generic HDMI monitor |
- |
- |
1 |
~$100 |
- |
- |
SK6812 RGBW LED strip |
SK68121M144-RGBWWW65 |
BTF-Lighting |
At least 2 |
$35 |
||
2.54mm pitch crimp connector kit |
US_CNN019 |
OCR |
1 |
$12 |
- |
|
3-pin extension cable (pack of 2m x 4) |
HL-LED79 |
Hualand |
At least 1 |
$12 |
||
5V10A DC power adapter |
P5V10A |
BTF-Lighting |
One per LED strip |
$22 |
||
Lumber boards |
- |
Home Depot |
One set per LED strip |
$17 |
- |
|
Generic matte black spray paint |
- |
- |
1 |
$6 |
- |
- |
Neutral Density (ND) filter sheets |
- |
Lee Filters |
Depends |
~$20 per diffusion box |
||
Lux meter/radiometer/spectrometer |
- |
- |
1 |
$200 to >5000 |
- |
|
UPS backup battery power |
BE425M |
APC |
1 |
$60 |
- |
|
Note
Estimated total cost for one MoonShineP system (excluding the illuminance measuring device) = $~560 (Feb 2023)
Tools#
Wire stripper (for small gauge wire ~22-26 AWG)
Needle pliers
Wood hand saw
Electric screwdriver
Basic supplies#
Wood screws
Masking tape
Foam pieces
Assemble Raspberry Pi and LED strips#
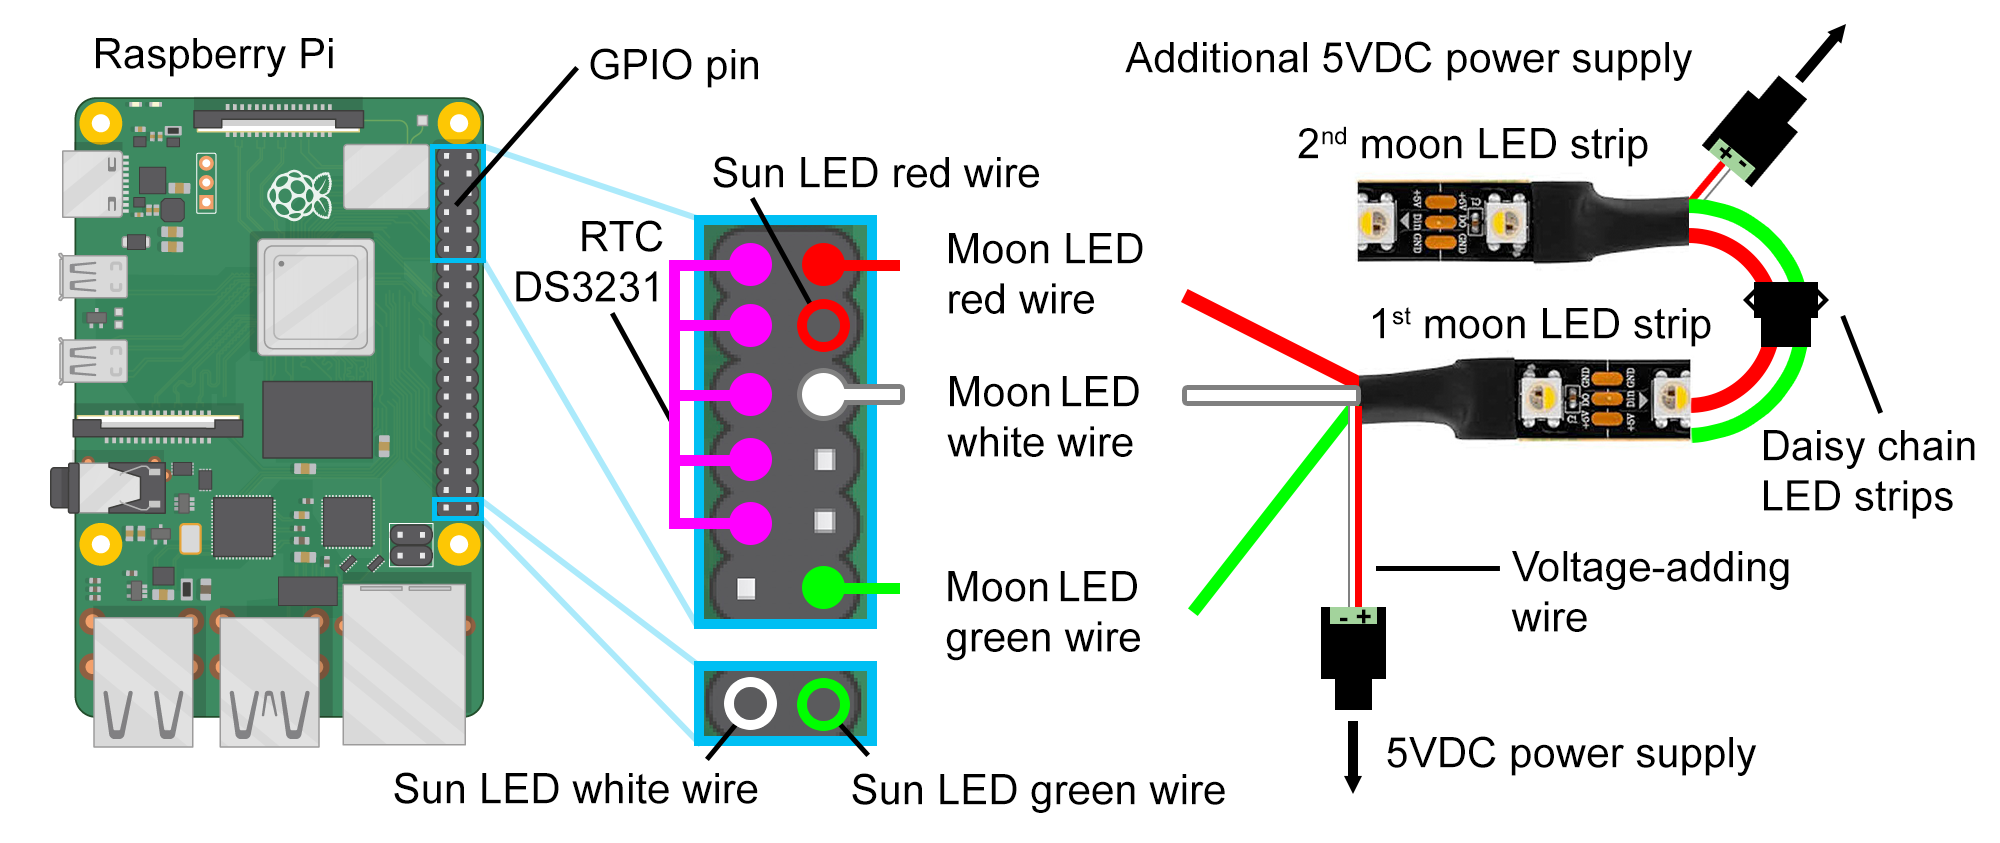
Fig. 30 Connection diagram for the Raspberry Pi, RTC module, and LED strips. The solid color circles (red, white, green) indicate the pins connected to the moonlight array of LED strips for moonlight recreation. The open color circles are connected to the sunlight/twilight array of LED strips, for the recreation of sunlight/twilight (while simutaneously re-creating moonlight). The wire color schematic is for the SK6812, made by BTF-Lighting, Guangdong, China. The RTC module connections are indicated in magenta circles. Right click and select ‘Open image in new tab’ to enlarge figure.#
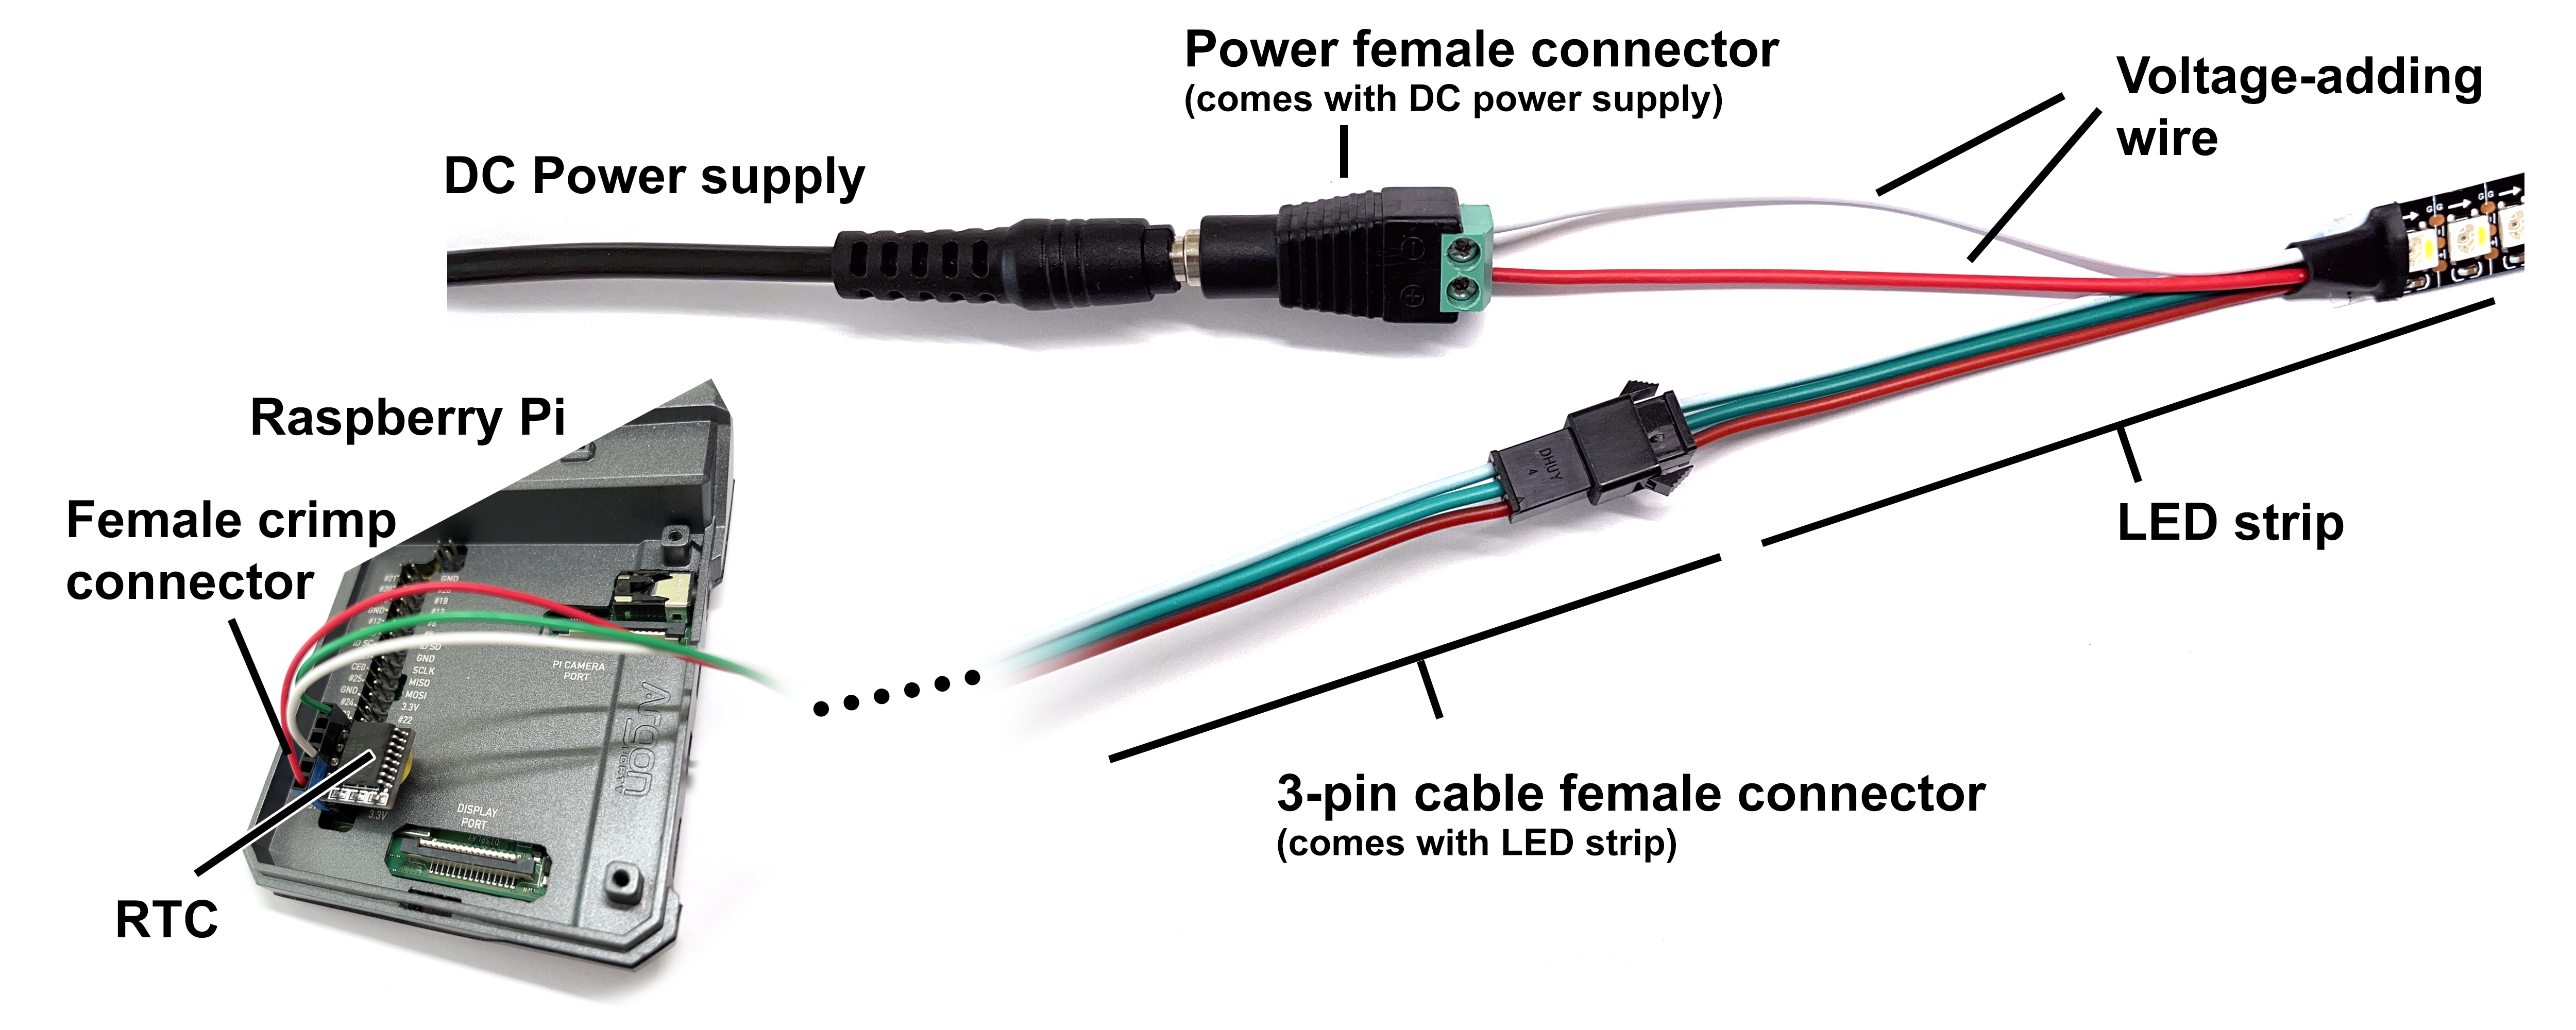
Fig. 31 Photo of the actual connection for one array of LED strips. Right click and select ‘Open image in new tab’ to enlarge figure.#
Follow the Raspberry Pi kit assembly instruction.
On the bare wire end of the 3-pin cable female connector that comes with the LED strip, put on the female crimp connector. See this guide for installing crimp pins with needle nose pliers. The user can decide whether to use three single-socket crimp connectors for each wire, or one 5-socket crimp connector for all three wires.
Follow Fig. 30 (solid color circles) for the pin locations of the first array of LED strips.
Plug in the fully assembled female crimp connector (after Step 2 is complete) into the Raspberry Pi GPIO pin so that the wires are connected to the correct locations.
Red wire goes into the 5V pin.
White wire goes into the ground pin.
Green wire goes into the GPIO 18 data pin.
Connect the 3-pin cable female connector to the male plug of the LED strip. (Add an extension cable if more length is required). Notice the arrows on the LED strip, this indicated the direction of the data flow (from Raspberry Pi to the array of LED strips).
Screw in the LED voltage-adding wires (red-positive and white-negative) to the power female connector that comes with the DC power supply. Pay attention to the polarity.
Plug in DC power supply.
Connect additional LED strips to this array from the other end (away from the Raspberry Pi) of the first LED strip. Add an additional DC power supply to each subsequent LED strips. Use 3-pin extension cable when needed to extend the distance between connections.
Install the real time clock (RTC) module as shown in Fig. 30. Make sure that it goes into the correct location, occupying five of the GPIO pins.
(Optional) To add a second array of LED strips for re-creating sunlight/twilight, while also running moonlight re-creation, follow Fig. 30 (open color circles) for the pin locations of the second LED array. Repeat Steps 2-8.
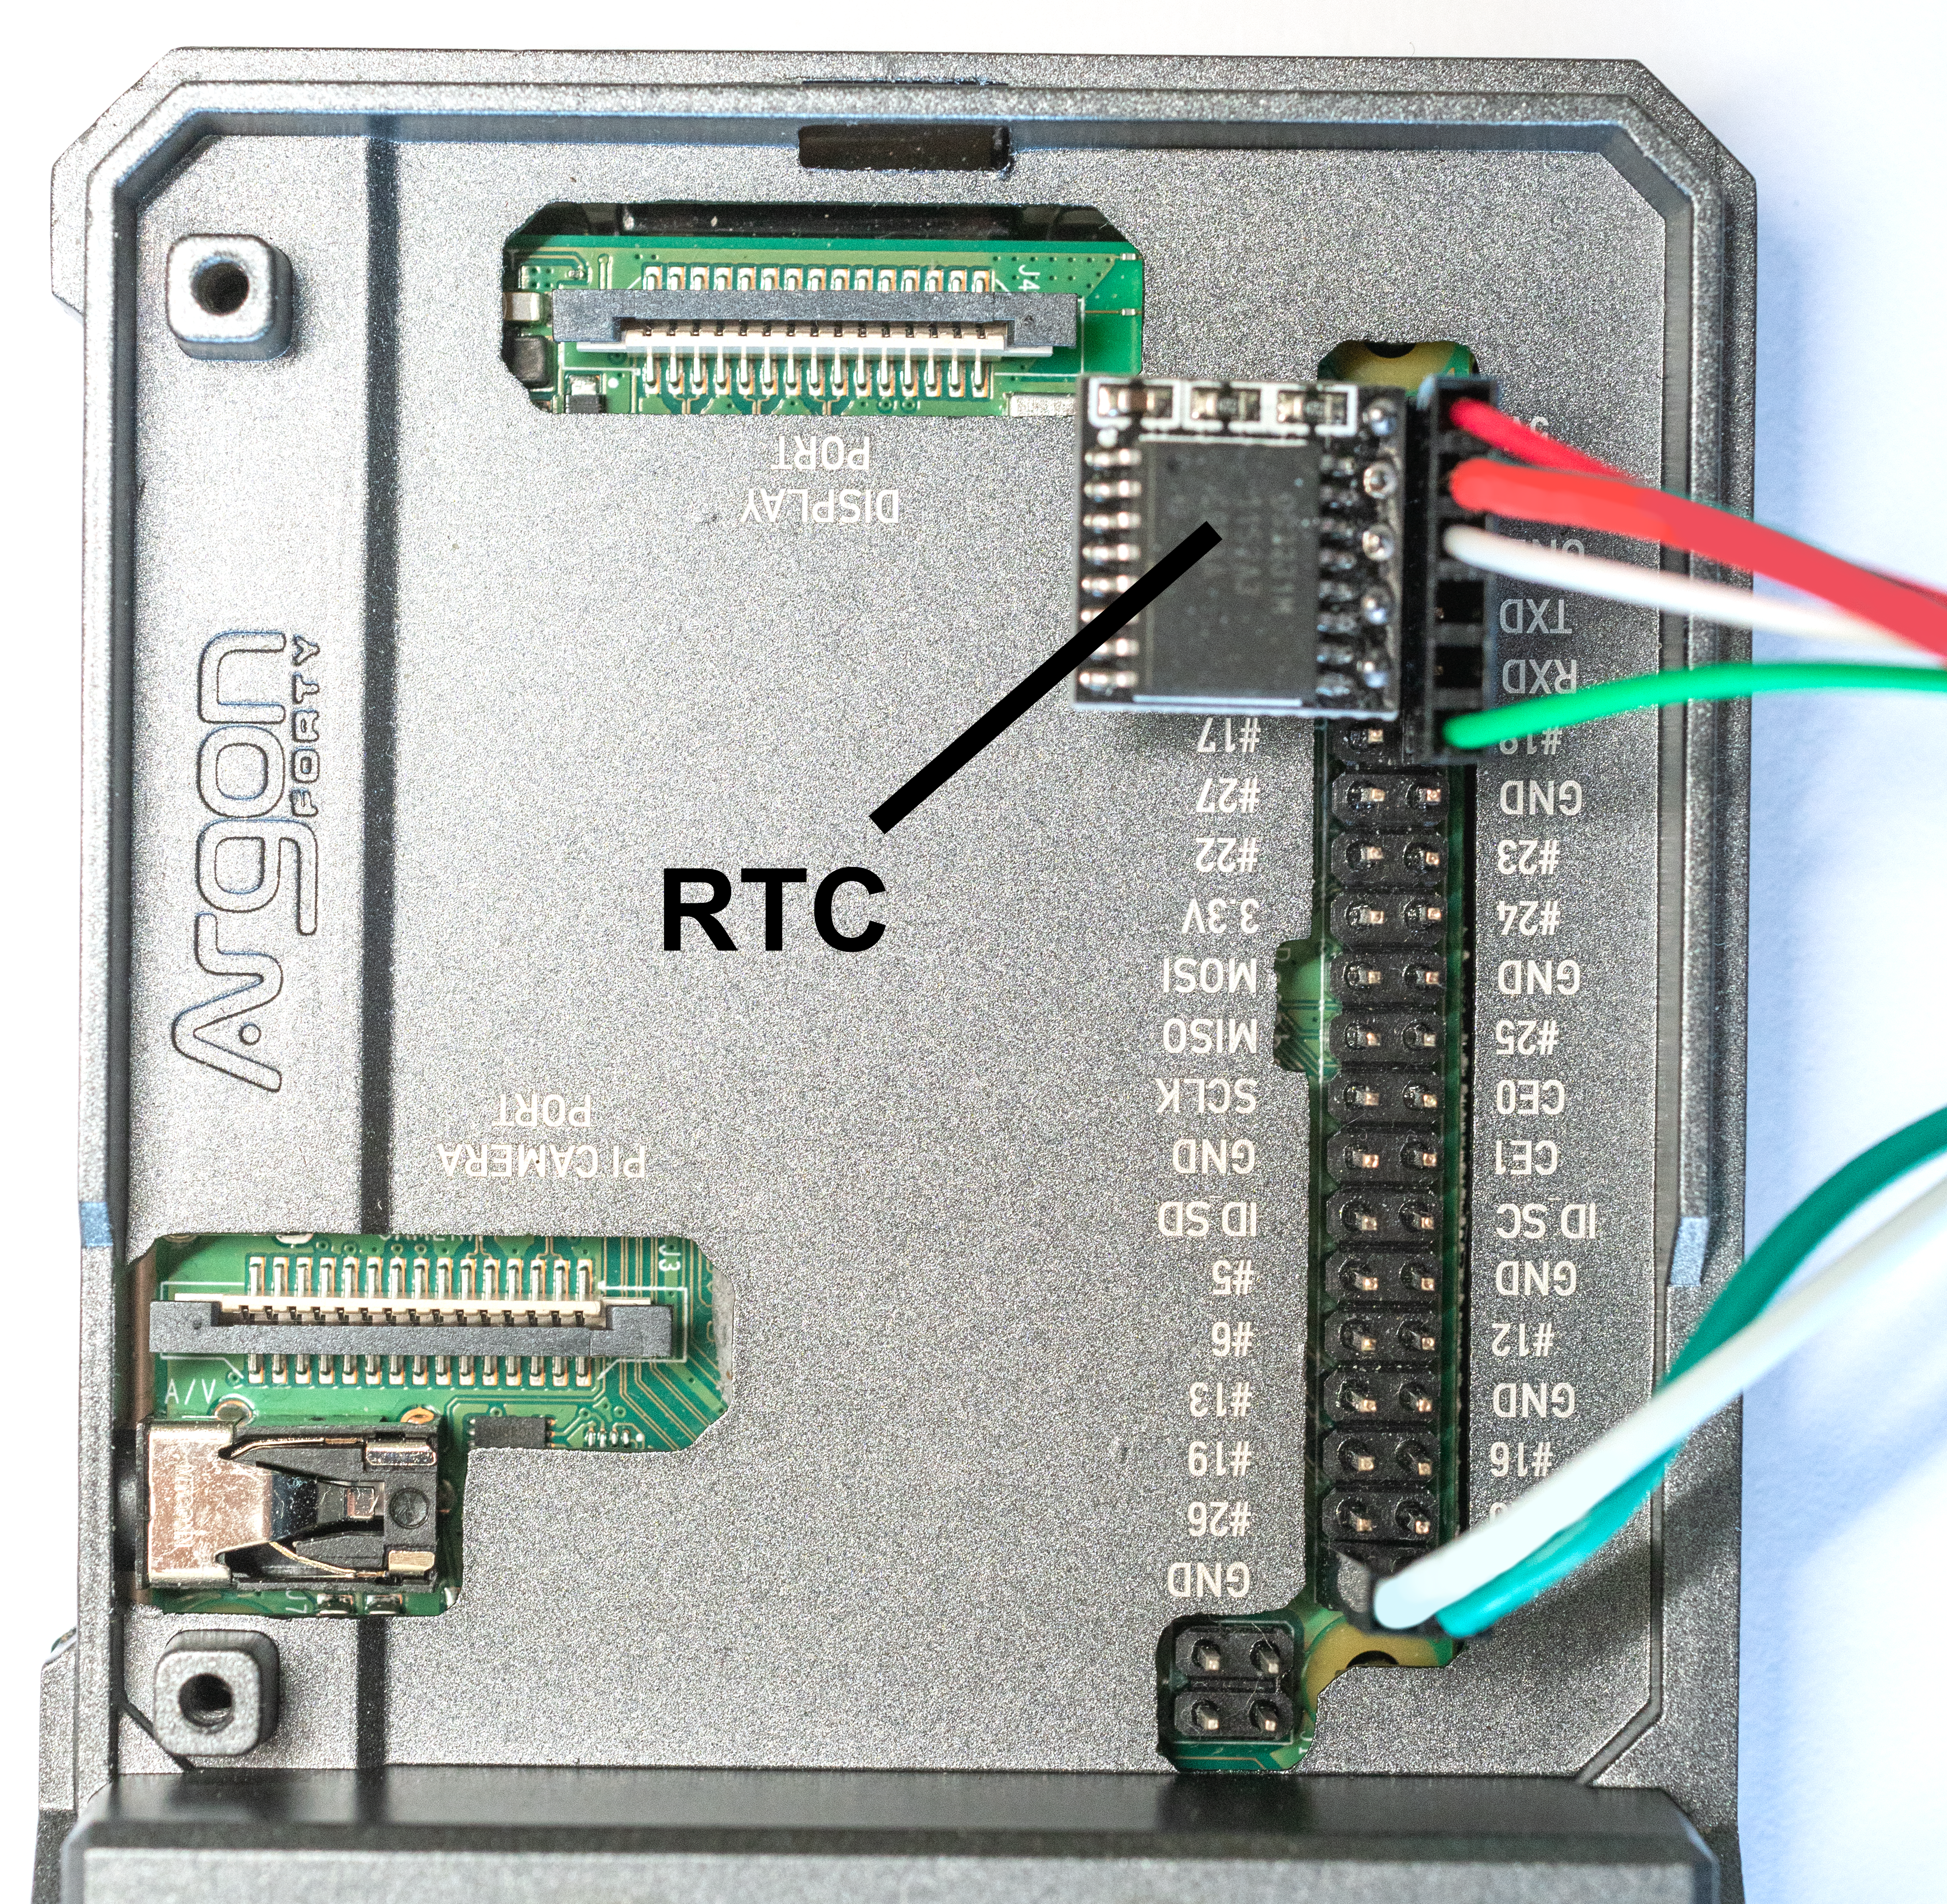
Fig. 32 The Raspberry Pi with the RTC and both LED arrays (moonlight and sunlight/twilight) connected. This matches the schemetic of Fig. 30.#
(Optional) To prevent power surge and outage event interrupting the light schedule, connect all power to an uninterrupted power supply (UPS).
Construction of diffusion box#
Make a diffusion box for each of the two LED strips used for moonlight recreation.
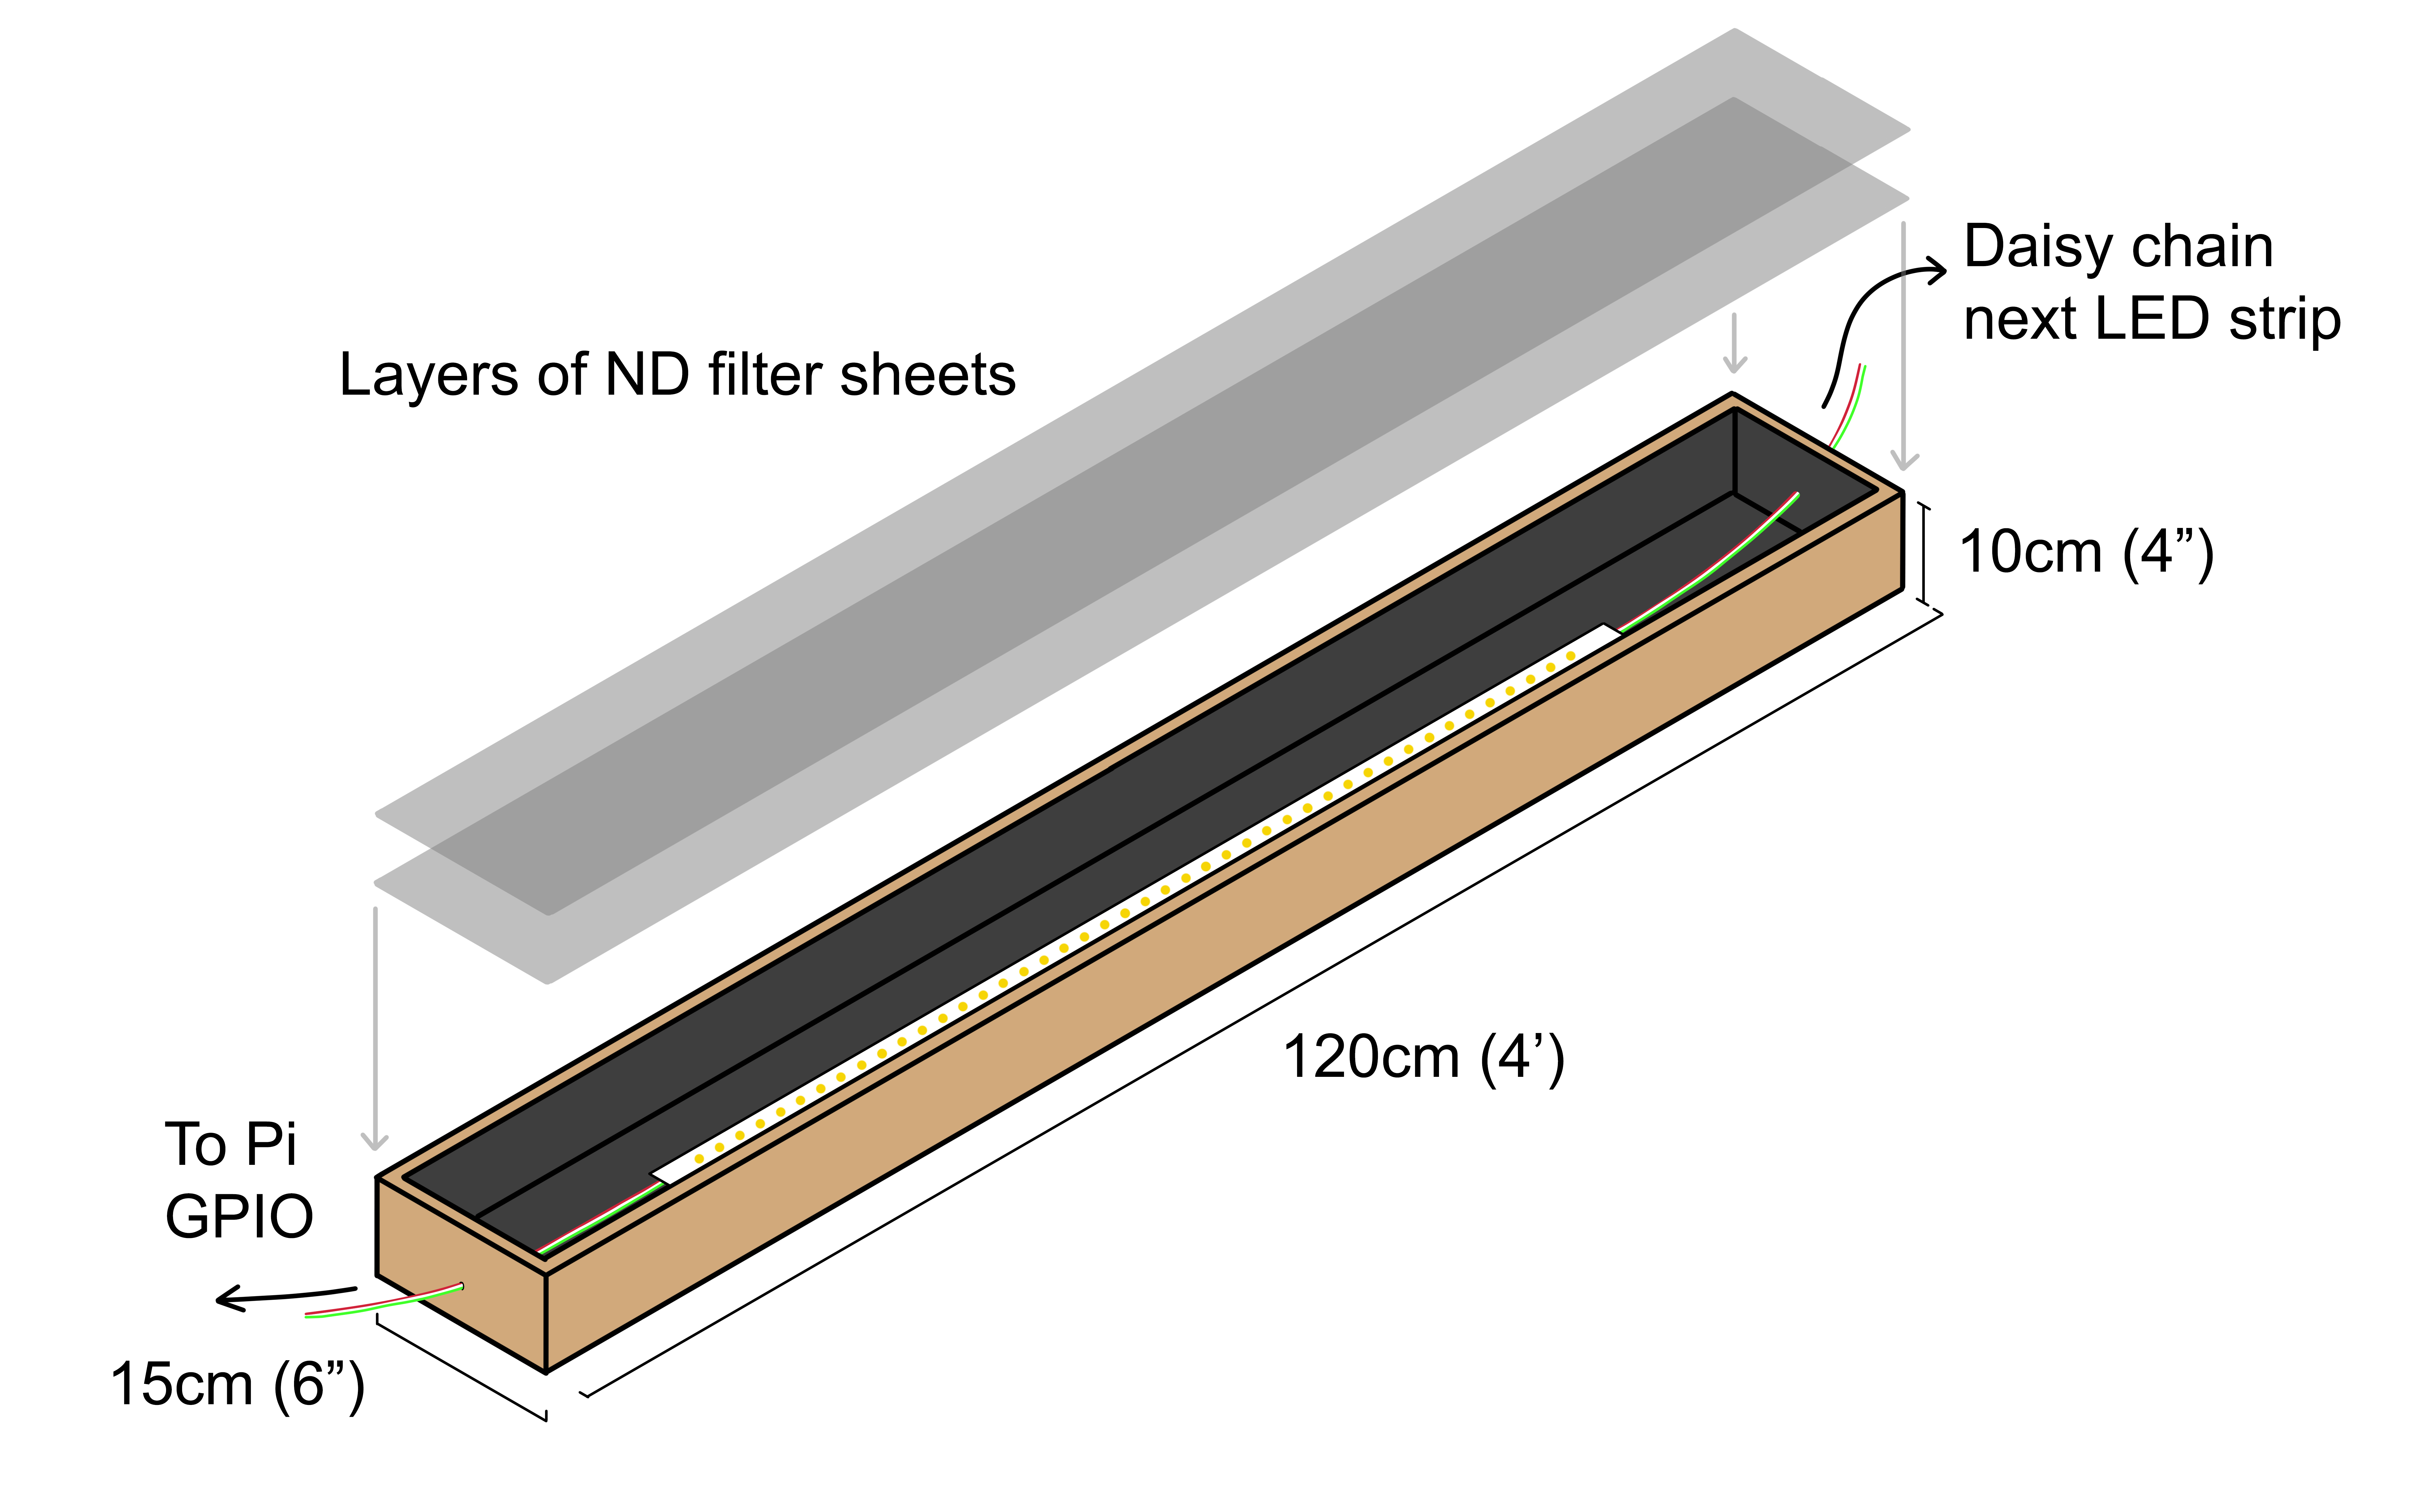
Fig. 33 Construction of a diffusion box housing one LED strip.#
Construct the wooden box as Fig. 33 with screws. With:
5/4” x 6” x 4’ board as the base.
A 1” x 4” x 4’ board on each long side.
Cut down a 1” x 4” x 4’ to get two end caps.
Spray paint the interior in matte black.
Affix the LED strip along the center of the bottom of the lightbox; the bottom of the LED strip has built-in adhesive.
Drill a small hole on each end of the box for the cables. Plug the hole with small pieces of foam to prevent light leakage.
Cut the ND filter sheets into the correct size, and secure them on the top opening with masking tape or pins. Ensure there are no light leaks. See 7. MoonShineP: Calibration for instructions on how many stacked ND filter sheets to use.
- 1
Any equivalent kit of the Raspberry Pi 4 model B from other companies would work. Beside the Raspberry Pi itself, the kit should include all the accessories such as HDMI cable, power supply, case, SD card, etc. MoonShineP only requires the 2GB RAM option, but there are options for more RAM (4GB or 8GB).
Prices are for February 2023. At the time of writing this document, the price of a Raspberry Pi is much higher than the official price due to supply issues.
- 2
We strongly recommend the following options: 1m, 144 LED, Warm White. There are IP65 water resistant and IP30 normal versions available for this model. The user can choose one suitable for the required application. We picked warm white to avoid a substantial blue spike in the white channel spectrum. A different strip length and LED number can be selected, but the 1m 144 LED is the best suited for most situations, and the default options in the MoonShineR suite will work for this model.
Two LED strips are required for moonlight recreation. More can be added, in multiples of two, to daisy chain many more strips, e.g., to generate a higher illuminance when recreating sunlight.
The PWM flicker rate of an SK6812 LED strip is ~1.1 kHz. This flicker frequency is much higher than the critical flicker fusion rates of animals (~400 Hz) (Inger et al., 2014), and is therefore unlikely to be detectable to animal subjects.
- 3
Buy enough connector cable to daisy chain the LED strips on opposite sides of the room.
- 4
To achieve maximum intensity, each LED strip requires its own 5V-DC 10A power supply.
- 5
The dimensions of the lumber boards for building one diffusion box:
Base: One of 5/4” x 6” x 4’ Home depot ($6)
Two Sides: Two of 1” x 4” x 4’ Home depot ($7.4)
End caps: Cut down a 1” x 4” x 4’ Home depot ($3.7)
- 6
The ND filter required depends on the user’s room and setup. It should take two or three filters per diffusion box to dim the lightbox. See 7. MoonShineP: Calibration to determine which ND sheet transmission % values to try out (the user may need to experiment with different combinations of ND sheets to achieve the desired illuminance).
Lee ND filter sheet types:
Lee 298 (ND 0.15, ½ Stop) = Transmission 69.3%
Lee 209 (ND 0.3, 1 Stop) = Transmission 51.2%
Lee 210 (ND 0.6, 2 Stop) = Transmission 23.5%
Lee 211 (ND 0.9, 3 Stop) = Transmission 13.7%
Lee 299 (ND 1.2, 4 Stop) = Transmission 6.6%
Rosco is another company that makes ND filter sheets.
- 7
“Lux meter” is a commercial term for a radiometer; these devices measure illuminance in lux. A measure of illuminance is essential to calibrate MoonShineP. A spectrometer is a radiometer that measures spectral irradiance – measures of light intensity values across (and just outside) the visible light spectrum. Spectral irradiance measurements can easily be converted into illuminance. Spectrometers are generally more expensive than radiometers, although precision low-light sensitive radiometers suitable for quantifying moonlight levels are also expensive.
An accurate illuminance measuring device is critical for calibrating MoonShineP, but ones that measures at low light are very expensive. We do not want the cost of the radiometer to discourage the use of MoonShineP for moonlight related experiments. Still, it is critical to obtain a meter that has NIST-Traceable calibration, like the International Light Technology ILT10C (lower limit of 10 lx, cost ~$350). Lower cost meters do not perform accurately at moonlight level illuminance (i.e., <0.3 lx). Where only a non low-light sensitive radiometer is available (able to read below 1E-2 lx with a resolution +/- 1E-2 lx or better), like the ILT10C, MoonShineP can be calibrated using a comparative method. See further explanations and solutions in Calibrating MoonShineP with a radiometer.
We used the International Light Technology ILT-5000 radiometer, with a SED 100-10/U broadband silicon photosensor, WU wide angle quartz diffuser, and Y4 photopic filter. This device is sensitive to light as low as 0.0002 lx.